Part 1: Why docMonster
1. The problem with "Scan_0001.pdf"
Every office that keeps a folder per client has the same daily routine:
- Scan the document. The scanner saves it as
Scan_0001.pdfin whatever folder it last used. - Find the file.
- Open Windows Explorer and click down through the network share to the right client folder.
- Think of a name. Type it. Hope it matches what everyone else calls that kind of document.
- Move the file. Do it again for the next one.
Each step is small, but together they add a minute or two to every document, and the result depends on who did the scanning. One person files "Trust Agreement", another "RLT signed copy", a third leaves it as "Scan_0001". Six months later, nobody can find anything quickly, and searching the folder means opening PDFs one at a time.
docMonster was built inside a busy estate-planning and trust-administration practice to make that routine disappear. Every day brought a stack of wills, trusts, deeds, bank statements, court papers and IRS letters, and every one had to land in the right client's folder with a name people could find later. The goal was simple: type a client's name, press Enter, scan, and be done, with the file correctly named and filed every time, by anyone on the team.
2. What docMonster does
docMonster lives in your Windows system tray. Press Ctrl+Space from anywhere and a small search bar appears.
- Find any client instantly. Type a few letters of the client's name and pick it from the list, even across thousands of folders on a network share.
- Scan straight into their folder. Press Enter, then click Scan. The PDF is saved in the client's
Scanned Documentsfolder, in the subfolder you choose. - Consistent names, every time. Names come from your firm's own list of standard document names (autocomplete), so everyone uses the same words.
- Or let AI name it. Leave the name blank and docMonster reads the document, suggests a clean name like
Utility Bill 06.15.26, picks a filing category, and puts it in the matching subfolder. You confirm before anything is filed. - Batch scan a whole stack. Put a docMonster QR code on the last page of each document and feed the pile through in one pass. docMonster splits and names every document.
- No scanner needed. Import PDFs, photos and Word, Excel or PowerPoint files and get the same naming and filing.
- Private by design. Only OCR text goes to an AI, never page images. Choose the offline local model and nothing leaves the PC at all.
- Jump to your CRM. Press Ctrl+Enter to open the same client in your practice-management system.
3. What it does for your company
| Benefit | What it means day to day |
|---|---|
| Time back, every document | Scanning goes from "scan, find, browse, rename, move" to "type name, Enter, Scan". |
| One naming standard for the whole firm | Autocomplete and AI naming rules apply the same convention no matter who scans. |
| Files people can actually find | Every PDF is date-stamped, descriptively named, filed in the right subfolder and sorted in scan order. |
| Easy onboarding | New hires don't need to learn the folder structure or naming policy. docMonster applies it for them. |
| Fewer misfiled documents | You pick the client from a list of real folders instead of clicking down a network share. |
| Works with what you have | Uses your existing client folders and any TWAIN scanner. No migration, no new document system, no server. |
| Control over client data | You choose what leaves the PC. Fully offline AI is one setting away, and a built-in compliance report helps you decide on AI vendors. |
| Free | No per-seat licence or subscription. Cloud AI costs only what your own API account charges, and the local model is free. |
A quick example. Suppose each person on your team scans 40 documents a day and docMonster saves 90 seconds on each. That's an hour a day per person. Plug in your own numbers: the saving grows with every desk and every document.
4. Who it's for
docMonster fits any office that keeps one folder per client, matter, patient, property or account:
- Law firms: estate planning, trust administration, probate, real estate, family law
- CPA and tax practices: engagement letters, W-2s and 1099s, IRS notices, workpapers
- Financial advisors: account statements, beneficiary forms, transfer paperwork
- Insurance agencies: applications, declarations pages, claims correspondence
- Real estate and title companies: contracts, deeds, closing statements, title commitments
- Healthcare and other professional offices: intake forms, referrals, correspondence
It ships tuned for estate and trust administration, and the AI Setup Assistant can re-tune it for your practice in a minute.
Part 2: Getting started
5. Install docMonster
System requirements
| Requirement | Details |
|---|---|
| Windows | Windows 10 or 11 |
| .NET Framework | 4.8 (already on current Windows; the installer tells you if it's missing) |
| Scanner | Any TWAIN-compatible scanner. Optional: you can import files instead. |
| Microsoft Office | Only needed to import Word, Excel or PowerPoint files |
| Internet | Only for cloud AI, AWS Textract OCR, updates, and one-time downloads of the local AI model |
| Disk space | About 2.5 to 5 GB extra if you use the offline local AI model |
Choose the right installer
docMonster comes in two builds. They're identical except for which scanner drivers they can talk to:
| Download | Pick it when |
|---|---|
| docMonster-Setup-x86.exe | Your scanner has a 32-bit TWAIN driver. Most scanners do, so this is the safe choice. It runs on 32-bit and 64-bit Windows. |
| docMonster-Setup-x64.exe | Your scanner's TWAIN driver is 64-bit only, or you don't use a scanner. |
Not sure? Install x86. If your scanner doesn't show up under Select Scanner, run the x64 installer; it replaces the x86 install in place. (Click Export... in Settings first to keep a backup of your setup.)
Install
- Run the installer. It installs for your Windows account only, so no administrator rights are needed.
- docMonster starts when the installer finishes, and starts automatically each time you sign in to Windows.
- Look for the docMonster icon in the system tray (bottom-right, near the clock; you may need to click the ^ arrow to see it).
To uninstall, use Settings → Apps → Installed apps in Windows. Your scanned documents are never touched: they live in your own folders.
6. First launch: point it at your client folders
The first time docMonster runs, it says "Please set the base client folder location." and opens DocMonster Settings on the General tab.
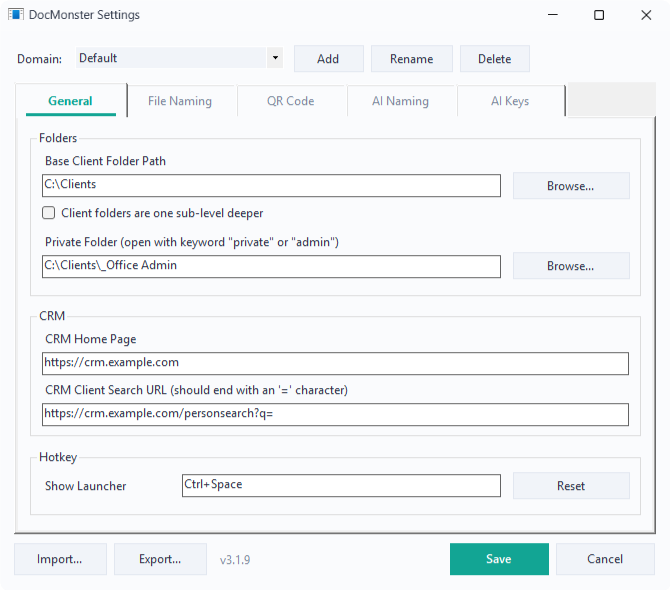
Base Client Folder Path (required)
Click Browse... and choose the folder that contains your client folders, not a client folder itself. It can be a local folder, a mapped drive or a network share.
C:\Clients\                      ← Base Client Folder Path
├── Adams, John\
├── Baker, Emily & Daniel\
│   └── Scanned Documents\       ← docMonster creates this
│       ├── Incoming\
│       ├── Outgoing\
│       └── Estate Plan\
└── Chen Family Trust\
Each folder directly inside the base folder appears in the launcher's search. docMonster creates Scanned Documents (and its subfolders) inside a client folder the first time you save to it, and never renames or moves your existing files.
Client folders one level deeper
If clients are grouped into intermediate folders such as alphabetical bins or years, check Client folders are one sub-level deeper:
C:\Clients\
├── A-F\
│   ├── Adams, John\             ← these are the clients
│   └── Baker, Emily & Daniel\
└── G-M\
    └── Garcia, Maria\
Private Folder (optional)
A personal or office-admin folder for paperwork that isn't a client's, such as vendor invoices or HR forms. Type private or admin in the launcher to scan into it or open it.
Save
Click Save. That's all docMonster needs to start working. Everything else in this guide is optional and can be added later.
7. A tour of the launcher
Press Ctrl+Space anywhere in Windows, or click the tray icon. The launcher appears:

- Search folders...: type any part of a client's name. Every word you type must appear in the name, in any order, so
emily bakerfinds Baker, Emily & Daniel. Matches appear instantly, even on a network share, because docMonster keeps an index of your folders and refreshes it automatically when folders are added or renamed. - Domain dropdown: switches between configurations if you use more than one (see Domains).
- The four icon buttons, left to right:
- Folder: opens the client's folder in Windows Explorer
- Scanner: opens the Scan Documents window for the client
- Dashboard: opens your CRM home page, or the CRM search for the client you typed
- Settings: opens DocMonster Settings. A red dot on the gear means an update is ready.
Pick a client with the mouse or the arrow keys, then:
| Press | To |
|---|---|
| Enter | Open the Scan Documents window for that client |
| Shift+Enter | Open the client's folder in Explorer |
| Ctrl+Enter | Copy the client's name and open them in your CRM |
| Escape | Hide the launcher |
If you've typed only part of a name, Enter uses the top suggestion. The launcher hides by itself when you click elsewhere.
Move it anywhere. Drag the launcher to wherever you like it; docMonster remembers the spot. If it ever ends up off-screen (after unplugging a monitor, for example), right-click the tray icon and choose Center Launcher.
The tray menu
Right-click the docMonster tray icon:
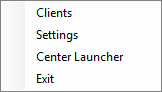
- Clients: opens your base client folder
- Settings: opens DocMonster Settings
- Center Launcher: moves the launcher back to the center of the screen
- Exit: closes docMonster until you next sign in (or start it from the Start menu)
8. Your first scan
Press Ctrl+Space, type part of a client's name, and press Enter. The Scan Documents window opens with the client's name in the title bar.
First time only: click Select Scanner, choose Scanner (TWAIN)… and pick your device. docMonster remembers it.
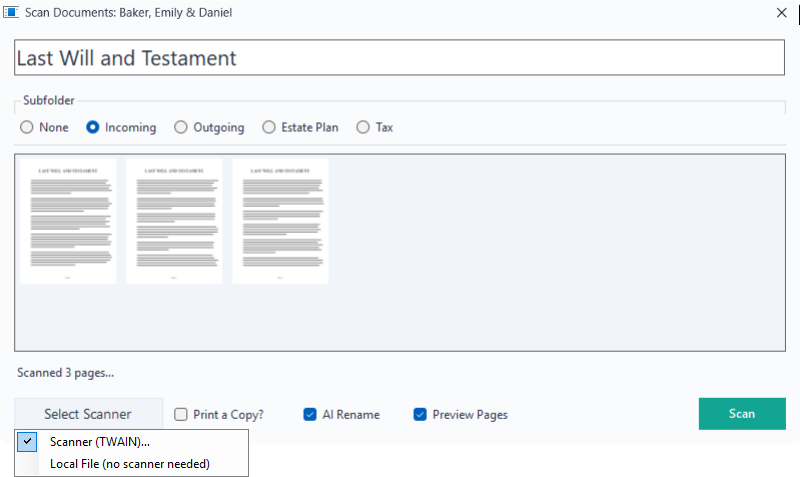
The Select Scanner menu with Scanner (TWAIN) and Local File options Type a document name, such as
Deed. As you type, docMonster completes the name from your known file names: the rest of the name appears highlighted. Keep typing to change it, or carry on with the completed name.Choose a Subfolder (Incoming is selected by default).
Click Scan (or press Enter in the name box). Your scanner's own window appears; scan as many pages as you like.
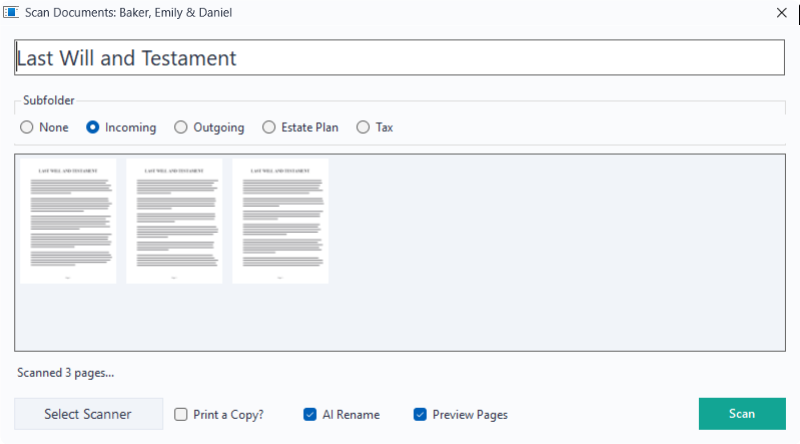
When the PDF is saved, Explorer opens at the destination so you can see it. The scan window stays open for the next document. Press Escape to close it.
Files are saved as:
{Client folder}\Scanned Documents\{Subfolder}\20261013143022 Deed.pdfThe timestamp prefix (year, month, day, hour, minute, second) keeps files in the order they were scanned. If a name is already taken, docMonster adds (2), (3) and so on. Nothing is ever overwritten.
Part 3: Set it up for your office
These settings live on the tabs of DocMonster Settings. Each tab's changes apply when you click Save.
9. Known file names (autocomplete)
Known file names are your firm's standard document names. The scan window's name box completes them as you type (Pow becomes Power of Attorney), so everyone files a power of attorney as Power of Attorney rather than "POA", "poa signed" or "Scan_0001".
Set them on the File Naming tab, one name per line:
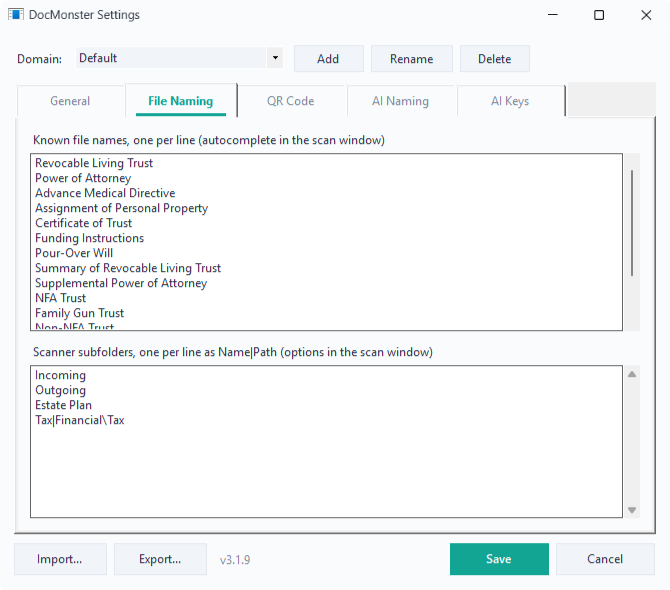
docMonster starts you off with a list of estate-planning names (Revocable Living Trust, Power of Attorney, Pour-Over Will, Deed, Drivers License and more). Replace or extend it with your own.
Tips for a good list
- Use the names your team already says out loud. If everyone calls it an "Engagement Letter", don't list it as "Client Services Agreement".
- Put the distinctive word first (
Bank Statement, notStatement - Bank). Completion matches from the start of the name, so it kicks in sooner. - Keep it to the documents you see weekly. Thirty to fifty good names beat three hundred rarely used ones. For the long tail, use AI naming.
- You can still type anything. The list completes; it never restricts.
Starter lists by practice
| Practice | Example known file names |
|---|---|
| Estate planning law | Revocable Living Trust, Pour-Over Will, Power of Attorney, Advance Medical Directive, Certificate of Trust, Deed |
| CPA / tax | Engagement Letter, W-2, 1099, IRS Notice, Prior Year Return, Organizer, Signed 8879 |
| Financial advisor | Account Application, Beneficiary Designation, Transfer Form, Account Statement, Risk Questionnaire |
| Insurance | Application, Declarations Page, Policy Change Request, Claim Form, Cancellation Notice |
| Real estate / title | Purchase Agreement, Title Commitment, Closing Disclosure, Deed, Payoff Letter |
Auto-print for estate-planning originals
In the scan window, check Print a Copy? to print a paper copy automatically whenever you scan a Revocable Living Trust, Irrevocable Trust, Last Will and Testament, Advance Medical Directive or Pour-Over Will. It's handy for signing ceremonies, where every original needs a client copy.
10. Subfolders
Subfolders decide where a document lands inside the client's Scanned Documents folder. Each one becomes a radio button under Subfolder in the scan window.
Set them on the File Naming tab under Scanner subfolders, one per line, in either form:
| Line | Button label | Saves to |
|---|---|---|
Incoming | Incoming | Scanned Documents\Incoming\ |
Estate Plan | Estate Plan | Scanned Documents\Estate Plan\ |
Tax|Financial\Tax | Tax | Scanned Documents\Financial\Tax\ |
The Name|Path form gives a short button label for a longer or nested path. None is always offered and saves straight into Scanned Documents. If you have an Incoming subfolder, it's selected by default each time the scan window opens.
Tips
- Keep it to a handful. Four to six buttons fit on one row and are quick to pick.
- Match your existing structure. If clients already have a
Correspondencefolder, useCorrespondence|Correspondence, or nest it with a path. - Let AI pick for you. With AI naming on, each category can have its own subfolder, so documents file themselves (see File categories).
11. Set up AI naming
With AI naming, you don't have to think of a name at all. docMonster reads the document's text and suggests a clean, consistent name and filing category, for example:
20261013143155 Utility Bill 06.15.26 (liabilities expenses).pdfYou always see the suggestion first and can change it.
Step 1: Choose an AI provider
Open Settings → AI Keys and pick an AI Provider:

| Provider | Runs | Best for | Needs |
|---|---|---|---|
| OpenAI | Cloud | High accuracy, fast | An OpenAI API key |
| Anthropic | Cloud | High accuracy, careful naming | An Anthropic API key |
| Grok (xAI) | Cloud | High accuracy | An xAI API key |
| Local model (offline) | On this PC | Maximum privacy, no API costs, works offline | A one-time download of about 2.5 GB |
Cloud providers: paste your API key. It's encrypted with Windows (DPAPI) and only ever shown as dots afterwards. Use a business or API account, not a personal chat subscription, and see the AI Compliance Assessment for how to configure it for client work.
Model: pick one from the dropdown or type a model name. docMonster checks it against the provider when you leave the field, and the status line below shows the result. Click Manage… to choose which of the provider's current models appear in the dropdown; new releases show up automatically.
Step 2: Choose how text is read (OCR)
Under Text Extraction, choose how docMonster reads the words on your pages:
| Method | Where it runs | Notes |
|---|---|---|
| Local OCR – PaddleOCR (offline, best for forms) | This PC | Recommended. Accurate on forms and statements; downloads once. |
| Local OCR – Windows built-in (offline, basic) | This PC | No download; fine for clean, typed letters. |
| AWS Textract | AWS cloud | Needs AWS keys (entered in the AWS group on the same tab). Sends page images to AWS. |
Step 3 (optional): Use the offline local model
Choose Local model (offline) as the provider for AI naming with no internet connection, no API key and no data leaving the PC.
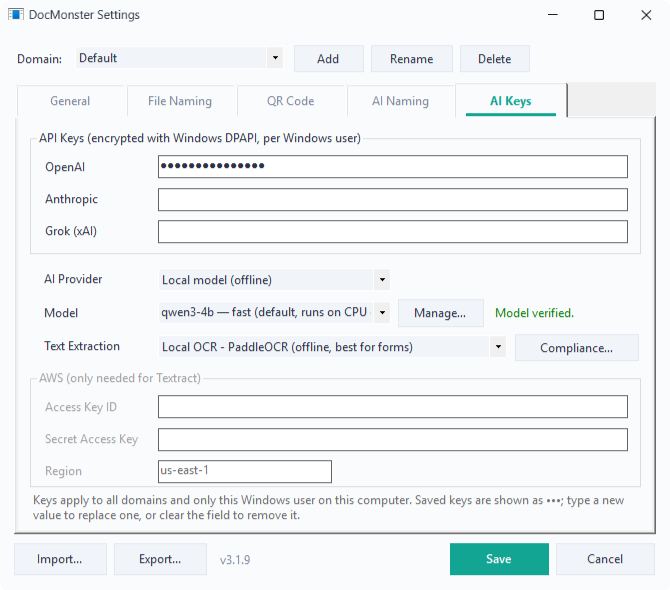
The first time you use it, docMonster downloads the model (Qwen3 4B, about 2.5 GB) and its runtime to %LOCALAPPDATA%\docMonster. It runs on your CPU, or on your graphics card automatically if you have one. On PCs with 8 GB or more of graphics memory, the larger qwen3-8b model gives better names.
Click Manage… to see installed models and the disk space they use, install the built-in choices, or search Hugging Face for other models. Remove deletes a model to free space.
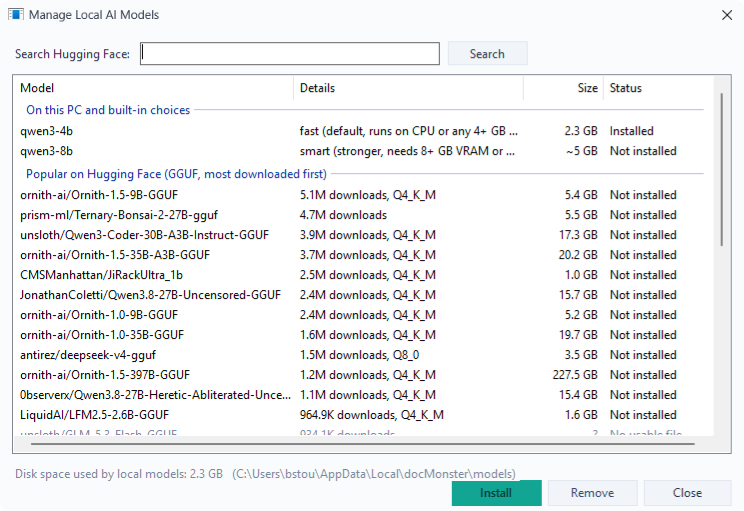
Fully offline setup: Local OCR (PaddleOCR or Windows) plus Local model (offline) means AI-powered naming with nothing ever leaving your computer.
Step 4: Turn it on
Open Settings → AI Naming, check Enable AI naming (scan with the name "auto" or blank), and click Save.
Using AI naming
In the scan window, do any one of these, then scan or import as usual:
- leave the name box blank
- type @@PROTECT3@@
- check AI Rename
docMonster saves the pages, reads the text of the first few pages and asks the AI for a name and category. Progress shows in the scan window, and the Cancel link stops it at any time:
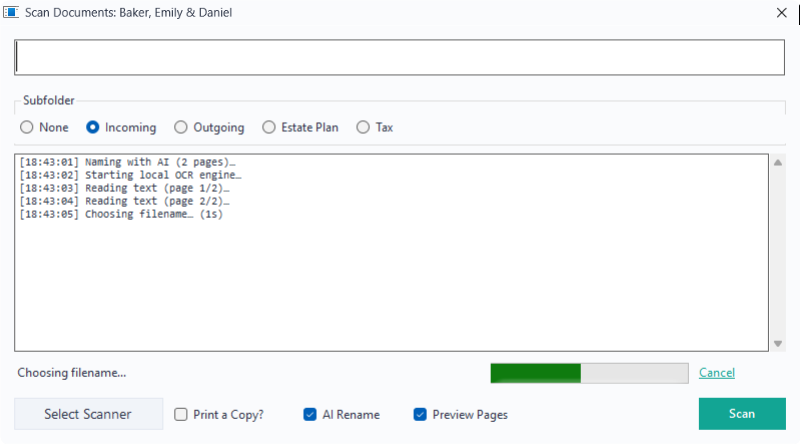
Then the Confirm File Name dialog appears. Accept the suggestion, edit the name, or pick a different category, then click Ok:
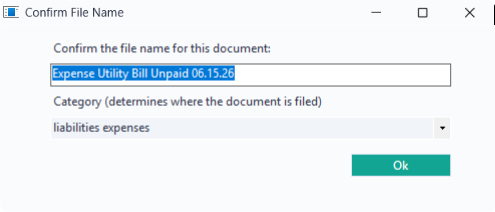
Nothing is filed until you click Ok.
12. File categories and naming rules
Categories are how docMonster sorts documents into the right place and names them your way. Each category has three parts, set on the AI Naming tab:
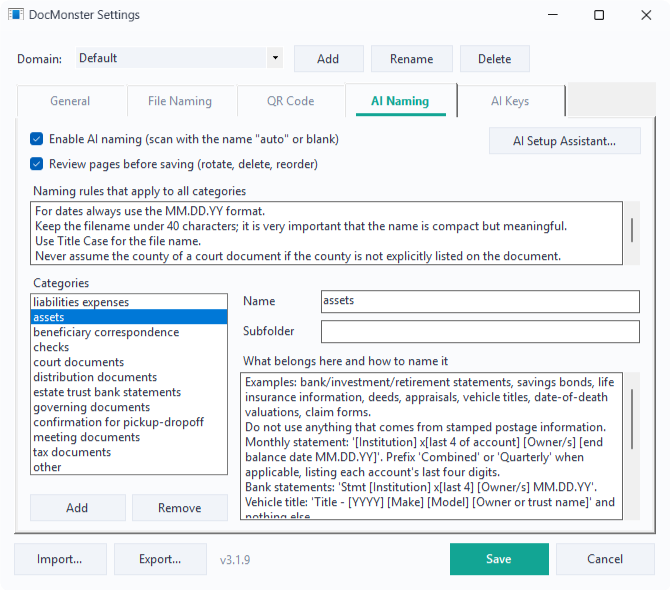
| Field | Purpose | Example |
|---|---|---|
| Name | The category, shown in the confirm dialog and added to the filename in parentheses | tax documents |
| Subfolder | Where documents in this category are filed, inside Scanned Documents. Leave blank to use whichever subfolder is selected in the scan window. | Tax |
| What belongs here and how to name it | Plain-English instructions for the AI | "IRS and state tax notices, returns, 1099s and W-2s. Name as the form or notice number, the tax year, then the agency, e.g. 'CP2000 2025 IRS'." |
Above the category list, Naming rules that apply to all categories set the house style for every document, for example:
Use Title Case.
Write dates as MM.DD.YY.
Keep names under 50 characters.
Never include account numbers or Social Security numbers.
docMonster ships with twelve categories tuned for estate and trust administration, including liabilities and expenses, assets, beneficiary correspondence, checks, court documents, distributions, bank statements, governing documents, meeting documents, tax documents and other.
Writing categories that work
- Say what belongs and what doesn't. "Bank and brokerage statements. Not tax forms; those go in tax documents."
- Give a naming pattern with an example. The AI copies examples closely.
- Keep an "other" category as a catch-all so unusual documents still get a sensible name.
- Use subfolders you'd file by hand. If the category has a subfolder, the document goes there automatically, whatever was selected in the scan window.
- Test with real documents. Scan five or six typical documents, look at the names, and adjust the wording.
Review pages by default
Review pages before saving, at the bottom of the AI Naming tab, makes Preview Pages the default in the scan window so every scan can be checked first (see Reviewing pages).
13. The AI Setup Assistant
Don't want to write categories by hand? Let AI draft them for you. When a cloud provider (OpenAI, Anthropic or Grok) has an API key, an AI Setup Assistant… button appears at the top of the AI Naming tab.
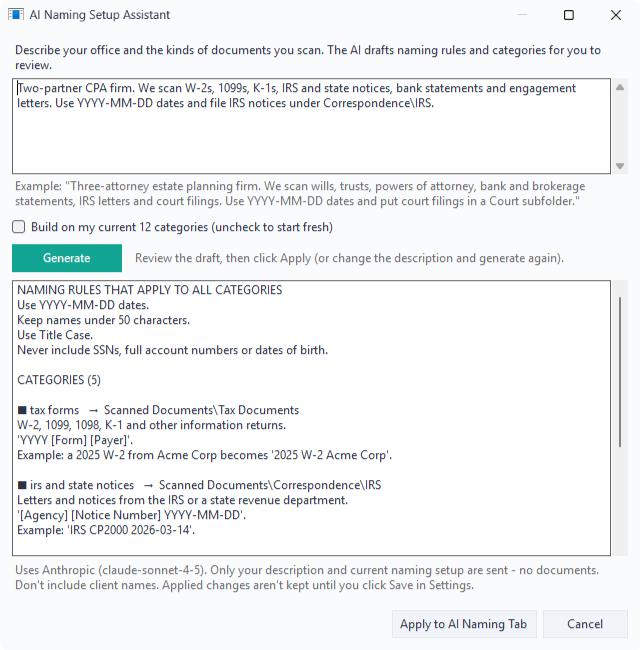
- Describe your office in plain words: what you do, what you scan and how you like names written. For example: "CPA firm. We scan W-2s, 1099s, IRS notices, engagement letters and bank statements. Use YYYY-MM-DD dates and put the tax year in the name."
- Choose whether to build on your current categories or start fresh.
- Click Generate. The assistant drafts naming rules and a set of categories with subfolders and naming patterns.
- Review the draft, then click Apply to AI Naming Tab.
- Adjust anything you like on the tab, then click Save to keep it, or Cancel to discard it.
Only your description and your current naming setup are sent to the AI provider, never documents. Leave client names out of the description.
14. QR code batch scanning
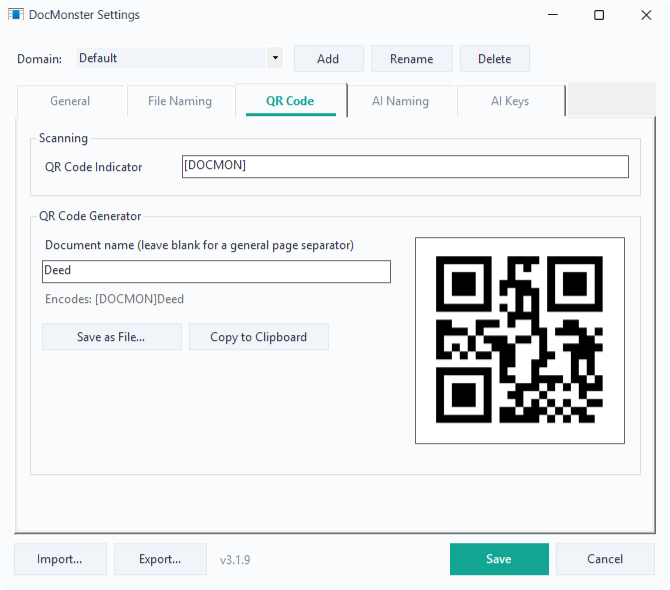
Got a stack of different documents? Put a docMonster QR code on the last page of each document, feed the whole pile through the scanner at once, and docMonster splits it into separate, correctly named PDFs.
Set it up (once)
- On the QR Code tab, enter a QR Code Indicator: a short marker such as
[DOCMON]or your firm's initials in brackets. Only QR codes that start with your indicator are used; any other QR code on a page (a website link, a shipping label, another firm's code) is ignored. - In the QR Code Generator, type a document name (or leave it blank or type
autofor AI naming), then click Save as File… or Copy to Clipboard. - Print the codes on separator sheets or label stickers. Make one for each of your common document types; you'll reuse them indefinitely.
Use it
- Put the right code on, or right after, the last page of each document.
- Load the whole stack and scan it in one go.
- Wherever docMonster finds one of your codes, it ends a document: every page since the previous code, up to and including the page with the code, is saved as one PDF.
- A code with a name (for example
[DOCMON]Deed) names those pages Deed. - A code with @@PROTECT3@@ names them with AI (or asks you for a name if AI naming is off).
- Codes can also add a
client_orspouse_prefix to the filename.
- A code with a name (for example
- Pages after the last code are saved normally, using whatever you typed in the scan window, or AI.
The page with the code is always kept, so codes can go on real pages; you don't have to waste separator sheets.
15. CRM links and the hotkey
On the General tab:
| Setting | What it does |
|---|---|
| CRM Home Page | Opened by the launcher's Dashboard button when nothing is typed |
| CRM Client Search URL | Your CRM's search address, ending in = (for example https://crm.example.com/search?q=). docMonster adds the client's name, so Ctrl+Enter or Dashboard jumps straight to that client. |
| Show Launcher hotkey | The key combination that opens the launcher. Click the box and press a new combination (it must include Ctrl, Alt or Shift). Reset restores Ctrl+Space. This applies to all domains. |
Finding your CRM search URL: search for any client in your CRM, then copy the address from the browser and delete the client's name from the end. What's left is usually the search URL.
If another program already uses your hotkey, docMonster tells you with a notification from the tray icon. Choose a different combination such as Ctrl+Alt+Space.
16. Domains: one setup, every desk
A domain is a complete, named set of settings: base folder, private folder, CRM links, known file names, subfolders, QR indicator and AI categories and rules. Domains let you:
- Work across several offices or practices, each with its own client share and naming rules. Switch with the dropdown on the launcher.
- Set up once and roll out to everyone. Configure docMonster on one PC, export the domain, and import it on every other desk.
Manage domains at the top of DocMonster Settings with Add, Rename and Delete. At the bottom:
- Export... saves the current domain as a
.jsonfile. You can include API keys, but they're saved in plain text, so docMonster warns you; only share that file over a secure channel, or leave keys out and enter them on each PC. - Import... loads a domain file.
API keys and the hotkey are shared by all domains, and belong to the Windows account on that PC.
Part 4: Everyday use
17. Scanning, step by step
The everyday workflow:
- Ctrl+Space, type the client's name, Enter.
- Type the document name (or leave it blank for AI).
- Pick the subfolder.
- Scan (or press Enter in the name box).
- Confirm the name if AI suggested one. Done. Explorer shows you the file.
The scan window stays open, so you can scan the next document for the same client right away.
Scan window controls
| Control | What it does |
|---|---|
| Name box | The document name, completed from your known file names as you type. Blank or auto means AI naming. |
| Subfolder | Where the PDF is filed inside Scanned Documents |
| Select Scanner | Choose your TWAIN scanner, or Local File to import instead |
| Print a Copy? | Prints estate-planning originals automatically (details) |
| AI Rename | Use AI naming even when a name is typed |
| Preview Pages | Review, rotate, delete and reorder pages before saving |
| Scan / Import… | Starts the scan or import |
| Cancel link | Stops AI naming while it's working |
Scanning into the private folder: type private or admin in the launcher and press Enter. The scan window opens pointed at your Private Folder.
18. Importing files without a scanner
Click Select Scanner → Local File (no scanner needed). The Scan button becomes Import… and you choose a file instead. Naming, AI, subfolders and page review work exactly the same.
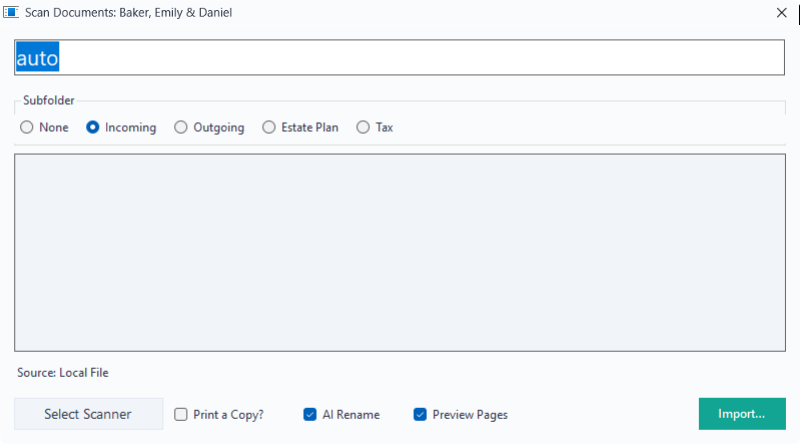
Supported files:
- PDF: each page becomes a page of the new document
- Images:
.jpg,.jpeg,.png,.bmp,.gif,.tif,.tiff(including multi-page TIFFs) - Office:
.doc,.docx,.rtf,.xls,.xlsx,.ppt,.pptx(requires Microsoft Office on the PC; docMonster converts them to PDF)
It's ideal for email attachments, phone photos of a document, or cleaning up and filing PDFs a client sent you.
19. Reviewing pages before saving
Check Preview Pages in the scan window (or turn on Review pages before saving in Settings to make it the default). After scanning, docMonster shows the pages before building the PDF:
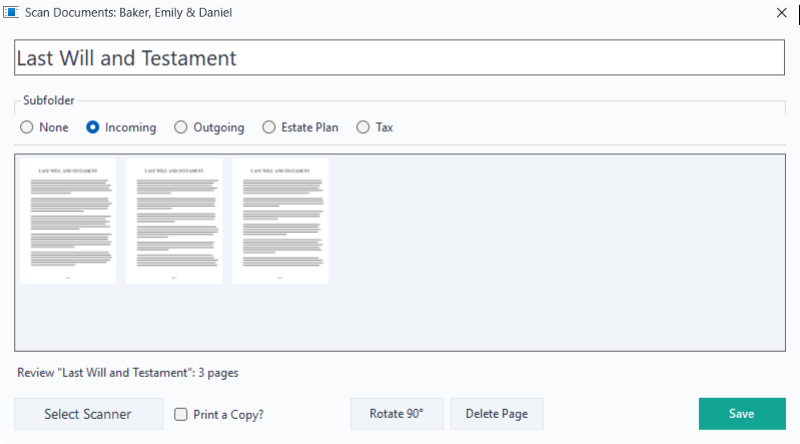
- Rotate 90°: fix pages that scanned sideways
- Delete Page: remove blank or accidental pages
- Drag thumbnails to put pages in order
- Save: build the PDF
20. Keyboard shortcuts
| Shortcut | Where | What it does |
|---|---|---|
| Ctrl+Space | Anywhere in Windows | Show the launcher (change it on the General tab of Settings) |
| Win+Ctrl+C | Anywhere in Windows | Open the base client folder |
| Type | Launcher | Search client folders; all typed words must match, in any order |
| Up / Down | Launcher | Move through suggestions |
| Tab | Launcher | Accept the highlighted (or top) suggestion |
| Enter | Launcher | Open the Scan Documents window for the client |
| Shift+Enter | Launcher | Open the client's folder in Explorer |
| Ctrl+Enter | Launcher | Copy the client's name and open them in your CRM |
| Enter | Scan window name box | Start scanning (or importing) |
| Escape | Launcher / scan window | Hide the launcher / close the scan window |
private or admin | Launcher | Use the Private Folder instead of a client |
Part 5: Privacy, compliance and maintenance
21. Privacy and data handling
docMonster has no server, no account system and no analytics. Your PDFs stay in your own folders. Here is exactly what can leave the PC, and when:
| Data | Leaves your PC? |
|---|---|
| Page images sent to an AI model | Never. Only OCR text is sent to an AI. |
| OCR with PaddleOCR or Windows built-in | No. Fully local. |
| OCR with AWS Textract | Yes. Page images go to AWS in the region you choose. |
| AI naming with OpenAI, Anthropic or Grok | Yes. OCR text from up to the first 5 pages, plus your category rules, goes to that provider. |
| AI naming with the Local model | No. The model runs on this PC (127.0.0.1). |
| The AI Setup Assistant | Your office description and current naming setup go to the cloud provider. No documents. |
| Update checks | docMonster checks GitHub for a newer release once a day. No personal data is sent. |
API keys are encrypted with Windows DPAPI for your Windows account on that PC. Other users on the PC can't read them, and they don't work if copied to another machine.
Temporary files made during AI naming and Office imports go to %TEMP%\docMonster and are deleted as soon as they're used. Anything left behind (for example after a crash) is deleted when docMonster starts and exits.
22. The AI Compliance Assessment
If you handle privileged or regulated client information, the built-in assessment tells you whether it's safe for your firm to use an AI vendor's API and chat plans (for example ChatGPT Business or Claude Team) for client work, and what to configure and tell your clients and staff.
Click Compliance… on the AI Keys tab:
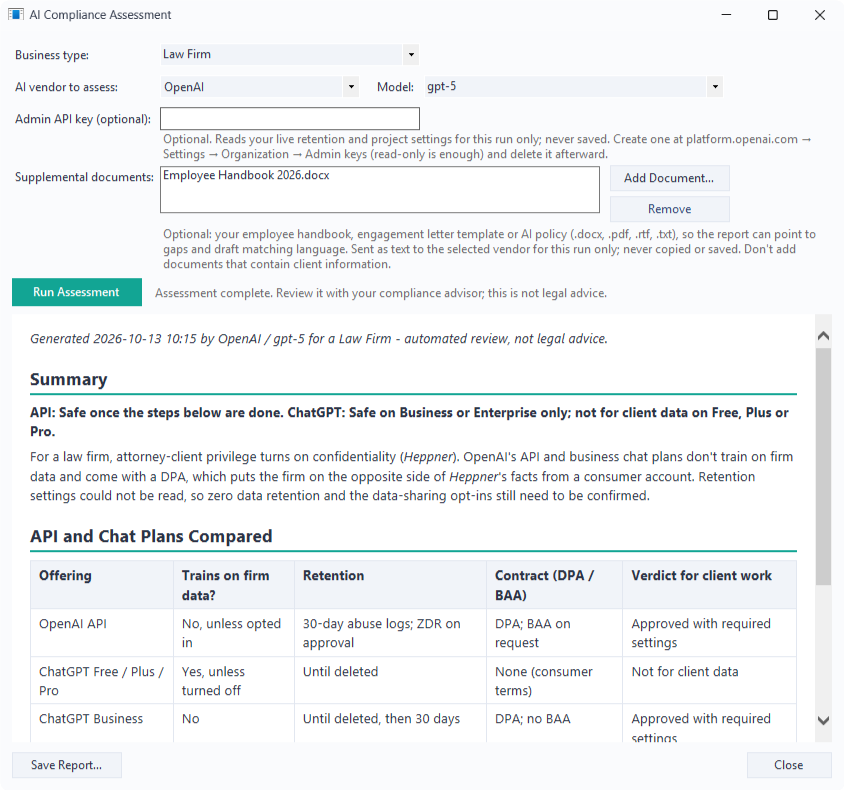
- Pick your Business type (Law Firm, CPA / Tax Practice, Financial Advisor, Healthcare Provider, Insurance Agency, Real Estate / Title Company, or type your own).
- Pick the AI vendor to assess and the Model that writes the report.
- Optionally paste an Admin API key (OpenAI or Anthropic) so docMonster can read your organization's live data-retention, workspace and residency settings. It's used once, read-only, and never saved; delete it in the vendor's console afterwards.
- Optionally Add Document… such as your employee handbook, engagement letter or AI policy. Don't add documents containing client information.
- Click Run Assessment. The report covers a plan-by-plan verdict, a checklist, recent court decisions on AI and privilege, step-by-step console settings, and draft handbook, engagement-letter and client-advisory language.
- Click Save Report… to keep it as a PDF, Markdown or text file.
The report is informational and not legal advice; review it with your compliance counsel.
On a Mac, or prefer your own AI assistant? The same assessment is available as a free kit for Claude Code, OpenAI Codex or Grok Build:
- Download docMonster-Compliance-Kit.zip and unzip it.
- Open a terminal in the AI Compliance Kit folder and start your assistant (
claude,codexorgrok). - Type Run the compliance assessment. The assistant asks about your firm, shows you how to add a read-only admin key to the kit's
.envfile yourself, and saves the report in thereportsfolder.
You need Python 3.8 or later. When you're done, delete the admin key in the vendor's console and delete the .env file.
23. Updates
docMonster checks for a new version when it starts and once a day after that. When one is ready, a red dot appears on the launcher's Settings gear, and an update button appears at the bottom of DocMonster Settings:

Click it. docMonster downloads the installer (showing progress), closes, upgrades itself and starts again on its own. You stay on the same build (x86 or x64) you installed, and all settings, domains and API keys are kept.
Part 6: Rolling it out
24. Rollout checklist for administrators
Plan (about 30 minutes)
- ☐ Confirm where client folders live (local or network share) and whether they're grouped one level deeper.
- ☐ Decide on the subfolders every client should have, for example Incoming, Outgoing, Estate Plan.
- ☐ Write down your 30 to 50 most common document names.
- ☐ Decide on AI: cloud provider (with a business or API account), the offline local model, or none.
- ☐ If using cloud AI with client documents, run the AI Compliance Assessment and apply its recommended settings.
Configure on one PC (about 1 hour)
- ☐ Install docMonster and set the Base Client Folder Path.
- ☐ Add your known file names and subfolders on the File Naming tab.
- ☐ Add your CRM links on the General tab.
- ☐ Set up AI on the AI Keys tab and tune categories on the AI Naming tab (or use the AI Setup Assistant).
- ☐ Set a QR indicator and print separator codes for your common documents.
- ☐ Scan 10 real documents and adjust names, categories and rules until you're happy.
Roll out (about 5 minutes per desk)
- ☐ Export... the domain (leave API keys out unless you can share the file securely).
- ☐ On each PC: install docMonster, Import... the domain, enter the API key if needed, and click Save.
- ☐ Run the 15-minute training session with the team.
25. A 15-minute staff training session
| Minutes | Topic | Show them |
|---|---|---|
| 0–2 | Why | No more Scan_0001.pdf, no more browsing the share; everyone's files look the same. |
| 2–5 | Finding clients | Ctrl+Space, type part of a name, Enter / Shift+Enter / Ctrl+Enter, Escape. |
| 5–9 | Scanning | Pick a known name, choose a subfolder, Scan. Show the file in Explorer. |
| 9–12 | AI naming | Leave the name blank, scan a bill or letter, review and confirm the suggestion. |
| 12–14 | Extras | Preview Pages, Local File import, QR batch codes (if you use them). |
| 14–15 | Questions | Hand out the quick reference card. |
Practice exercises
- Open the folder for a test client using only the keyboard.
- Scan a two-page document as Power of Attorney into Estate Plan.
- Import a PDF from your desktop and let AI name it.
- Scan a three-page document, delete a blank page and rotate a sideways page before saving.
- Scan three different documents in one pass, separated by QR codes.
26. Troubleshooting and FAQ
"Please set the base client folder location." keeps appearing. docMonster needs a Base Client Folder Path. Set it on the General tab and click Save.
A client is missing from the search. Check that the client's folder is directly inside the base folder (or one level deeper, with that option checked). New folders appear automatically within a few moments; reopen the launcher to refresh.
Ctrl+Space doesn't open the launcher. Another program may be using that combination. docMonster then tries the same keys with Win added, but Windows often reserves those too. If neither works you'll see a "hotkey unavailable" notification from the tray icon: pick a different hotkey on the General tab, such as Ctrl+Alt+Space. Clicking the tray icon always works.
The launcher has disappeared off-screen. Right-click the tray icon and choose Center Launcher.
My scanner isn't listed under Select Scanner. docMonster uses TWAIN drivers. Install the TWAIN driver from your scanner maker's website. Most are 32-bit and need the x86 build; 64-bit-only drivers need the x64 build.
AI naming doesn't start. Check all three: Enable AI naming is on (AI Naming tab), a provider and model are set (AI Keys tab), and the name box is blank, says auto, or AI Rename is checked.
The model check fails on the AI Keys tab. Re-check the API key and model name. The status line under Model shows the provider's exact error, such as an invalid key or a billing problem on the account.
AI names aren't quite right. Improve the category instructions with a naming pattern and an example, and add house-style rules to Naming rules that apply to all categories. Try a larger model, or PaddleOCR for forms.
Word or Excel import fails. Office imports need Microsoft Office on the same PC. Or save the file as a PDF in Office and import that.
Is our data used to train AI models? docMonster itself sends nothing except what's listed in Privacy. For cloud AI, your provider's data policy applies to the text sent; business and API accounts generally don't train on your data, and the Compliance Assessment checks your settings. Or use the local model and keep everything on the PC.
"docMonster is already running." Only one copy runs at a time. Press your hotkey or click the tray icon.
Where are settings stored, and how do I back them up? In your Windows user profile. Use Export... in Settings to back up a domain, and Import... to restore it.
27. Quick reference card
docMonster in 30 seconds
Do this Press Open the launcher Ctrl+Space Scan for a client Type name → Enter → name the document → Scan Let AI name it Leave the name blank (or type auto)Open the client's folder Shift+Enter Open the client in the CRM Ctrl+Enter Open the Clients folder Win+Ctrl+C Import a file instead Select Scanner → Local File Your own paperwork Type privateoradminHide / close Escape Files land in Client → Scanned Documents → Subfolder, named
Date Time Name.pdf. Nothing is ever overwritten.